New Component Called "Person Listing"
This article covers the following topics:
- What is the Person Listing Component
- What the Person Listing Component Looks Like
- How to Add the Person Listing Component to a Page
- Additional Resources
We recently introduced a new component called Person Listing. Many of our users have expressed a need to easily add a person profile card to a page. We created this component so that you can highlight an individual or a team on your website.
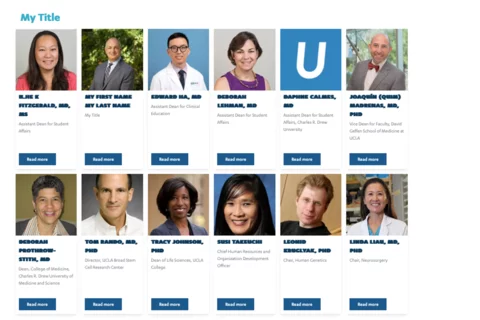
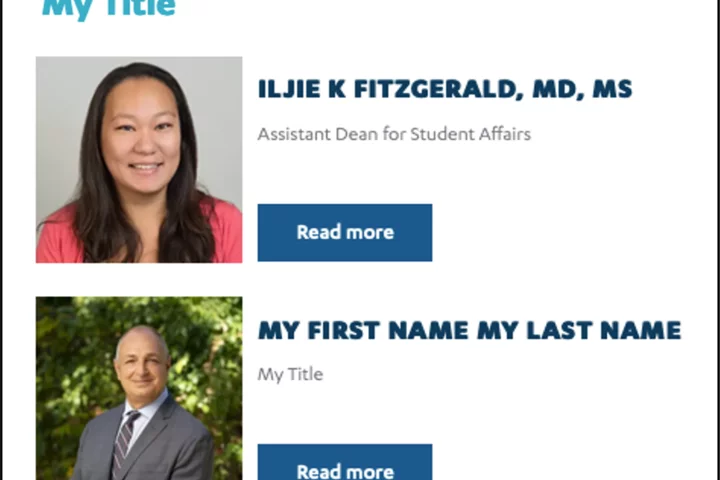
What the Person Listing Component Looks Like:
Horizontally – The person cards will automatically scale to fit the size of the section where they are placed.

Vertically – The person cards will automatically scale to fit the size of the section where they are placed.
How to Add the Person Listing Component to a Page:
Create the new person page:
- Log in to your site.
- Hover your mouse over Content.
- Hover your mouse over Add content.
- Click Person.
- Complete as many fields as needed:
- Add the First Name (Mandatory Field)
- Add the Last Name (Mandatory Field)
- Add a Portrait Image (Mandatory Field)
- Add a Position (Mandatory Field)
Go to the page where you would like to place the component:
- Click Edit content.
- Click the plus icon where you want to place the component.
- Select Person Listing.
- Add the Title of the group you are creating.
- Start typing the name of the person(s) you would like to add in the person field.
- Click the Add another item to add additional persons.
- You are able to reorder the person listing by clicking the all direction arrows.
- Expand Layout Options.
- Select Grid to have your person page displayed horizontally.
- Select List to have your person page displayed vertically.
- In the Spacer section, you can select the amount of additional space you would like below the component. Note: By default, there is no space below a component.
- Click Save.
- Scroll to the bottom of the page and click Save.
Additional Resources:
- Review the Paragraph Library for more detailed instructions.
- Join the next Co-Working Session to have your questions answered.
Related Articles

Automatic Logout Update for Web Platform
Users will be automatically logged out after 2 hours of inactivity to enhance security. This update ensures better protection and takes effect on August 29th.
Updates to Media Library Management
The latest updates to the media library, including new requirements for PHI, PDF accessibility, file naming conventions, and automated deletion of unused media.
Drafting and Previewing Pages
Discover how to effectively review and preview your pages, including tips for viewing a true representation as well as additional resources.
Add Events to your Calendar
Enable users to add your events directly to their calendars with ease. Automatically integrates with Outlook, Apple iCal, and Google Calendar.